Autoscaling on Azure
Here at SATAVIA we process many hundreds of thousands of flight trajectories in order to determine the exposure to various atmospheric contaminants. Because we are a SaaS/DaaS(Software/Data as a Service) offering we are driven by customer requirements and timescales. As such our service needs to be highly responsive to spikes in demand. Our challenge is to deliver the best quality analysis to our customers, in an acceptable time scale while making the most efficient use of Azure compute resources. We strive to have a highly responsive platform that scales up and down resources in response to demand automatically without manual intervention.
SATAVIA DecisionX’s trajectory exposure calculation relies on the existence of specialized memory optimized compute instances to complete trajectory exposure jobs. To achieve and maintain an acceptable job completion rate we often need to allocate multiple Azure D32 instances to the processing cluster. As this would drive the compute cost up, we need to make sure that we utilize these resources as much as possible when processing takes place, but also that we have a way to automatically deallocate these compute resources when there are no jobs available. The problem in our case is that we cannot rely on traditional, simplistic resource utilization metrics (CPU, memory) to make the decision on when to allocate/deallocate resources. As a result, existing solutions such as Azure VM Scale Sets do not solve our problem as they scale based on CPU metrics.
Instead, we decided to use the number of jobs in a queue, as our scaling metric and we implemented a custom scaling solution based on this metric. We use Apache Airflow to create a workflow that runs in 10-minute periodic intervals. During every run the workflow queries a job table to find out how many jobs arrived in the queue and how many of them completed in the last 10 minutes. If that ratio is above a specific threshold then a decision is made to scale the number of instances allocated to the trajectory processing. However, instantiating fresh Azure VMs, means that we still need to account for provisioning and application deployment in an automated way once the VM is up and running.
The solution to this problem comes from our container orchestration and container cluster management platforms, Kubernetes and Rancher. Kubernetes is the industry standard orchestration and management platform for containerized applications deployed across clusters for VMs or bare metal servers. In addition, we use Rancher as a Kubernetes cluster management system, to easily provision and maintain different Kubernetes clusters (development and production grade). Rancher has connectors for all well-known cloud providers and can be used to provision managed clusters (e.g. AKS, EKS) or automatically deploy VMs against any cloud infrastructure and build the cluster from scratch. In addition, Rancher uses node templates to create groups of nodes that share similar characteristics (resources, network security rules etc.).
Once our Airflow workflow decides that the number of processing instances needs to scale, it sends a message to the Rancher REST API to scale the number of VMs assigned to a node group specifically created to host the trajectory exposure application. Subsequently, Rancher contacts the Azure API to create the VM, and once the VM is created Rancher automatically provisions the VM and attaches it to the existing Kubernetes cluster.
The new VM is now part of the K8S cluster, however we still need to deploy the application. Since the application responsible is containerised and deployed as a Kubernetes application, we had the option to use a special K8S controller called Deployment. A Kubernetes Deployment is responsible for parsing an application specification and maintain a number of pod replicas by reacting to changes and updates. However, by using its default scheduler Kubernetes could not guarantee the exact host that a pod would be deployed on. We needed exactly one pod per VM in the VM node group we created for processing trajectories.
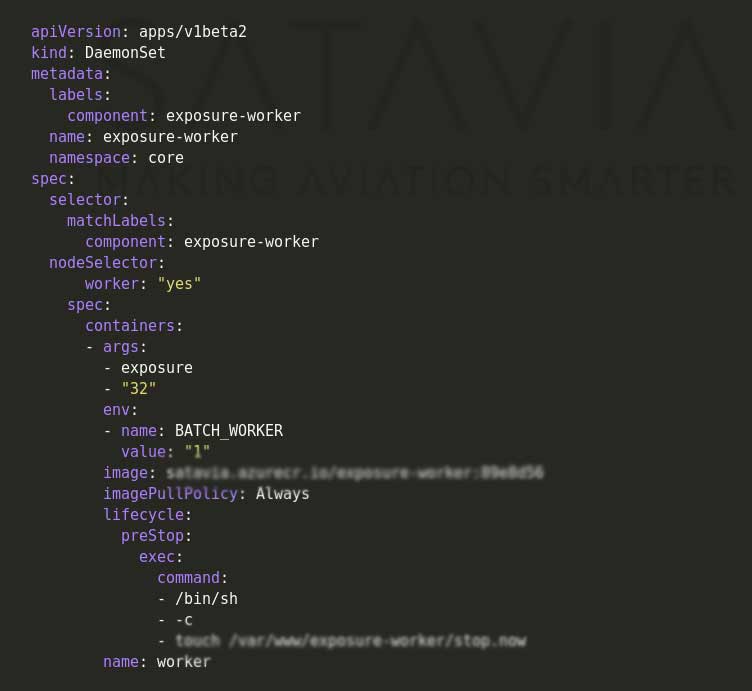
Figure 3. Our application is deployed as a Kubernetes DaemonSet. The “nodeSelector” yaml tag will instruct the controller to deploy the application to nodes that are marked by the “worker=yes” label. A DaemonSet ensures that only one pod per node will be scheduled.
Thus, we chose to switch to a Kubernetes DaemonSet. A DaemonSet is similar to a Deployment, however it deploys only one pod per node in the cluster. It can automatically scale the number of pods by reacting to changes in the number of available nodes in the cluster. The last piece of the puzzle that we needed to solve was to ensure that our trajectory exposure application would be scheduled only on that specific VM node group. Luckily Kubernetes offers the ability to narrow the number of schedulable nodes by specifying the .spec.template.spec.nodeSelector to the specification document of the DaemonSet. The node selector queries the Kubernetes API to match nodes that have a specific key value pair assigned to them called label.
Thus, by applying the appropriate labels in the VM node group, we were able to create a DaemonSet that deployed the application only to that node group. This also provided the benefit of reducing the complexity of our Airflow scripts. Airflow did not need to explicitly contact the Kubernetes API to increase the number of pods; once Rancher added an extra node to that specifically labeled node group, the Kubernetes DaemonSet would immediately detect the change and would schedule an new pod to the node. A single call to the Rancher API would create a new D32 instance, provision in, join it to the cluster and deploy our application instance, which in turn would immediately start processing jobs.
Our infrastructure can react to any number of jobs and fully scale to the maximum number of compute instances within 30 minutes. Similarly, it can as quickly scale down to the minimum once the number of jobs falls under a certain threshold. This enabled us to maintain high performance while keeping overall utilization and cost efficiency as close to 100% as possible.


